Quick Start Guide and Frequently Asked Questions
To view your website, simply click on the "Preview Site" link within the CMS located in the upper left corner on every page. You will remain in "Preview Mode" until you click on the "Publish and Point Site to My Domain" link also located near the top of the left navigation on every page. Once you click on "Publish and Point Site to My Domain", your website will then sync to the domain name that you signed up with. At this point you will need to update your domain's DNS settings to point to our server. Click here for the instructions. Getting Started with Direct Support: If you would like us to adjust your DNS settings for you, please provide us with the login information to your domain registrar and we would be happy to assist. You can submit your request here.
Please Note: After your domain is connected to your website with Real Estate Designer, you can still preview what you are working on and then publish to live as you make additional changes. Any new changes made will not go live until you click on "Publish Changes to Live Site". Once you login to the CMS, you will notice the left hand navigation displays all of the default pages for your website. To edit specific pages, simply click on the page link, then add or modify your content and click "Save". Getting Started - Logo, Photo and Contact Information
|
How do I insert my logo into my website?After you login to the Admin Control Panel, by default you will be in the "Common Settings" section. Scroll down and you will notice the "Company Logo" section. Click on the browse button to locate your logo from your computer and select it. Check the box next to the preferred size. Then click "Save". You can upload your logo in the following acceptable formats; JPEG, GIF, PNG. Please note there are 2 sizes you can upload, standard and full-width. Full width would be used if you wanted to use a banner style logo that would be the full width of the site dimensions. Standard is more of the traditional size that you would see on most websites. Standard Size Logo Dimensions Full Width Logo Dimensions If the image uploaded exceeds the default maximum width, it will be re-sized down and constrained by the width but will remain proportional. Your logo is optional. 
|
How do I change my template design?After you login to the Admin Control Panel within the Common Settings section, scroll down to the bottom of the page. Using the "Template Selector" drop down, choose your new design choice and save.
|
How do I upload my personal or company photo that will appear on the home page and all internal site pages?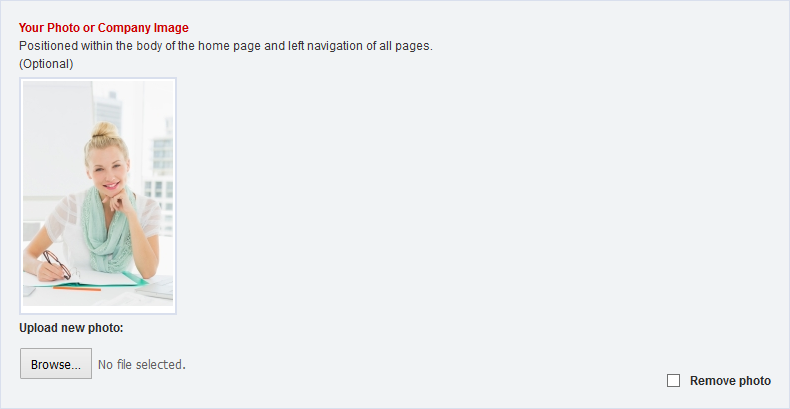
This option is also managed within the "Common Settings" section of the Admin Control Panel. Here you can add "Your Photo" or a "Company Photo". Simply, click on the browse button and locate your photo and select it from your computer. Then click "Save". You can upload the following formats; JPEG, GIF, PNG. Please note that there is a maximum width of 150 pixels for your photo but not a maximum height. If your photo exceeds this default maximum width, it will be re-sized down and constrained by the width but will remain proportional. Your photo is optional.
|
How do I change my email address and phone number that is displayed on every page of my website?By default, the contact information that is displayed throughout your website comes from the information that you entered when you registered with Real Estate Designer. This default information can be managed via the main "Contact" page within the Admin Control Panel. You can also manage the contact information that will be displayed throughout your site independently from the main "Contact" page settings. To do so, simply click on the "Common Settings" link and scroll down to the section entitled "CONTACT INFORMATION FOR ALL PAGES". Adjust accordingly and click save.
|
How do I adjust and manage the slideshow to use my photos or manipulate the existing?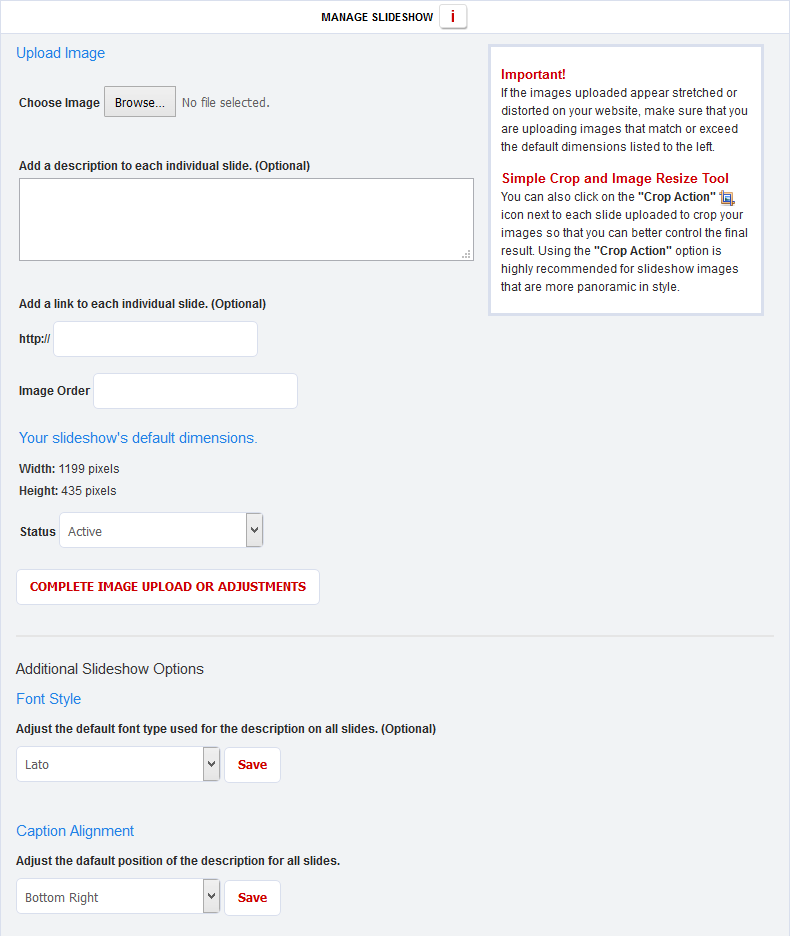
Once you login, click on the "Manage Slideshow" tab within the top navigation. Within this section you can upload and manipulate your photos. Options within this section:
Need to crop your slideshow photos to fit into your template?Try the easy to use Image Cropping Design Tool directly in the CMS. To do so, click on the "Crop Action" icon |
What are the acceptable file types that I can use for the home page slideshow?The acceptable file types are JPEG or PNG at resolution 72dpi . There is a default dimension displayed in the "Manage Slideshow" section to follow for your template. Your images will be displayed on your site at these dimensions even if you do not crop them.
|
How do I change my name that appears on my home page?After you login to the Admin Control Panel, click on the "Contact" link within the left hand navigation. Here you will find the fields labeled "First Name:" and "Last Name:".
|
How do I change my Professional Title that appears on my home page?After you login to the Admin Control Panel, click on the "Contact" link within the left hand navigation. Here you will find the field labeled "Professional Title:". You can enter whatever you like in this location. |
How do I add IDX (MLS) to my website?The Prestige PlanOption 1: Use Your IDX
Your MLS search or listings will then be displayed within the body of your new page. By default, the new page link created will appear within the left hand navigation. IDX Power-Plus PlanOption 2: Use Our IDX Click here to view details and examples. You can choose the plan that works best for you during registration but if you need to upgrade, email us at anytime and we will begin the process. Please include the following information when making your request:
Not sure which IDX solution is right for you? Click here to compare plans, options and pricing details. |
How do I manually add properties to my website?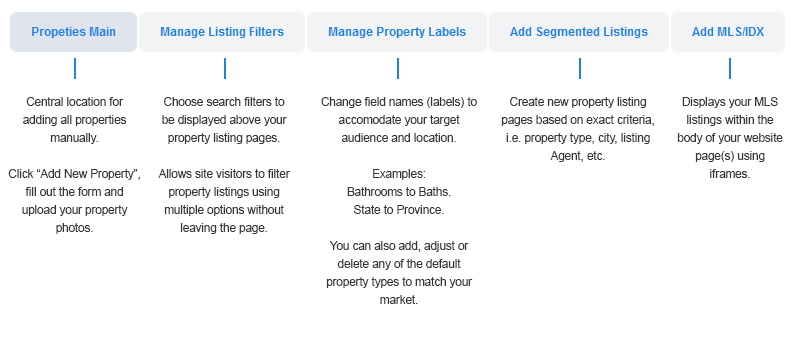
After you login to the Admin Control Panel, click on the "Manage Properties" tab within the top navigation. Then click on the "Add New Property" button and fill out the optional fields and upload your photos. Just remember to click save once you are finished. There are other options to choose from within this section. Please refer to the diagram in this section for reference.
|
How do I add featured properties to my home page?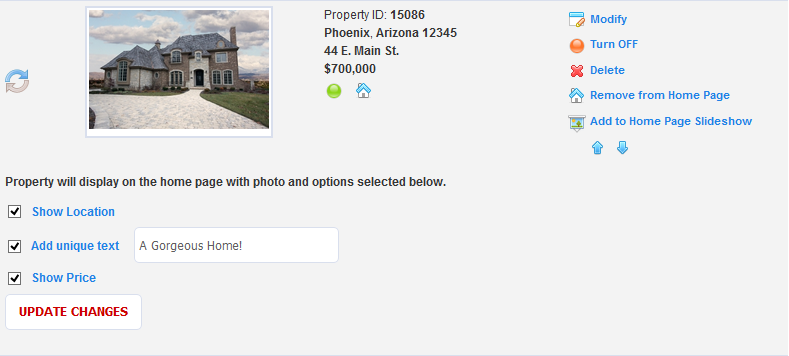
After you login to the Admin Control Panel, click on the "Manage Properties" tab within the top hand navigation. Locate the property within the listing page that you would like to feature on the home page and click on the link to the right labeled, "Display on Home Page". Options within this section:
Make sure you check the box next to each option chosen and click "Update" when finished.
|
How do I order my individual properties that appear on my main property listing page?From within the Manage Properties section, "Drag and Drop" your properties into position or use the "Up and Down" arrows. Then click "Save".
|
How do I add additional property listing pages based on unique parameters?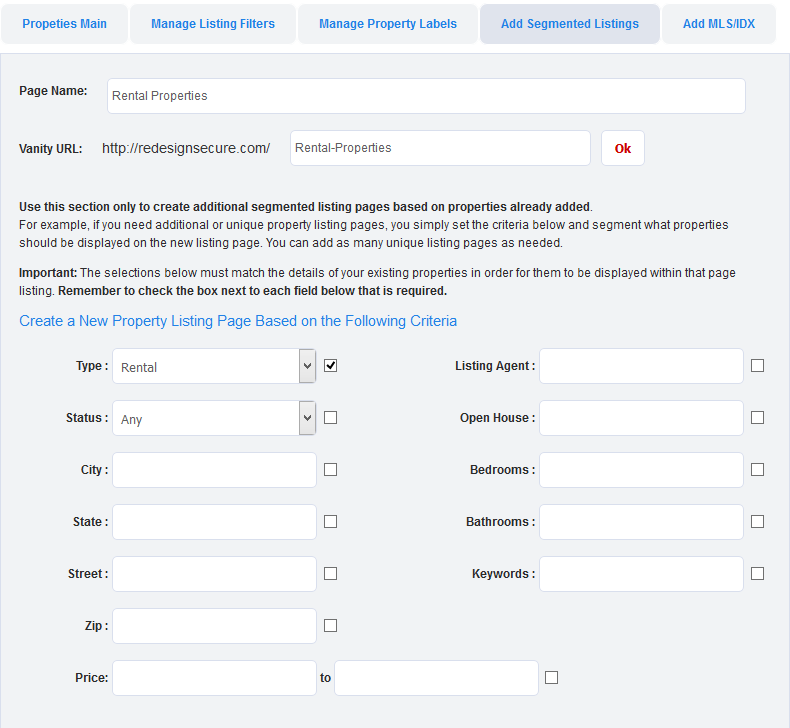
From within the "Manage Properties" section, click on the tab, "Add Segmented Listings". This section is optional. By default, you already have a main property listing page entitled Properties. If you need property listing pages that are more unique or specific, this section allows you to create listing pages based on specific property details from the properties that you have already added manually. The example property listing in this section will show all properties with property type set as "Rental". Notice the checkbox is enabled next to the "Rental" type. You can add as many unique listing pages as needed. |
How do I change the property detail page labels and property types from their default values?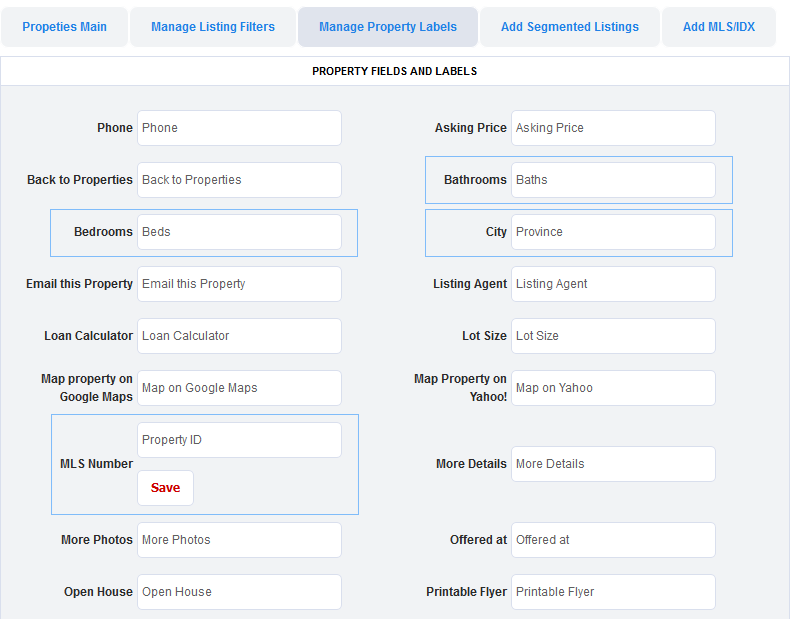
From within the "Manage Properties" section, click on the tab, "Manage Property Labels". Within this section, you can change all of the property template field names (labels) to accomodate your target audience and location. Any changes that you make will also be reflected within your property listing pages. This section can be very useful if the default property field labels do not match your demographic. This first simple example shows the following labels have been changed; Bedrooms to Beds, Bathrooms to Baths, City to Province, MLS Number to Property ID. This next example shows your option to update the property types that may be better suited for your location and market. 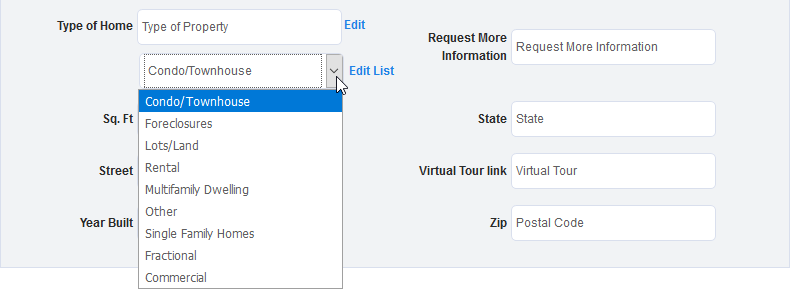
You begin by clicking on "edit list" within the "Type of Home" section. 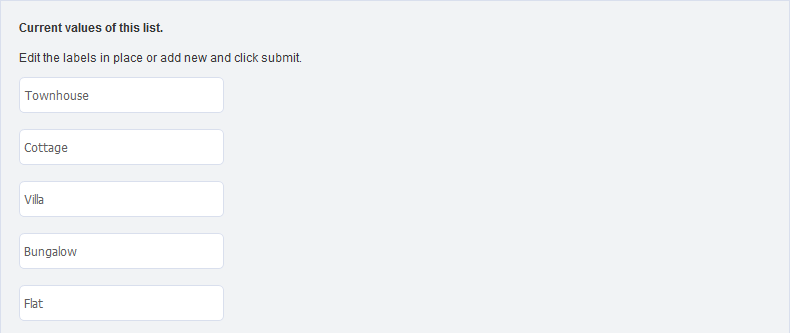
On the next page, update existing labels in place with the option to add more as needed. In this example, we have chosen to adjust Condo/Townhouse to Townhouse, Foreclosures to Cottage, Lots/Land to Villa, Rental to Bungalow and Multifamily Dwelling to Flat. Finish by saving your work.
|
How do I add new pages to my website?After you login to the Admin Control Panel, click on the "Add New Pages" link within the left hand navigation. Select your page type from one of the 4 options.
You can control how your new pages are displayed using the Manage Menu link within the left hand navigation of the Admin Control Panel. |
How do I manage where my navigation links are being displayed on my site?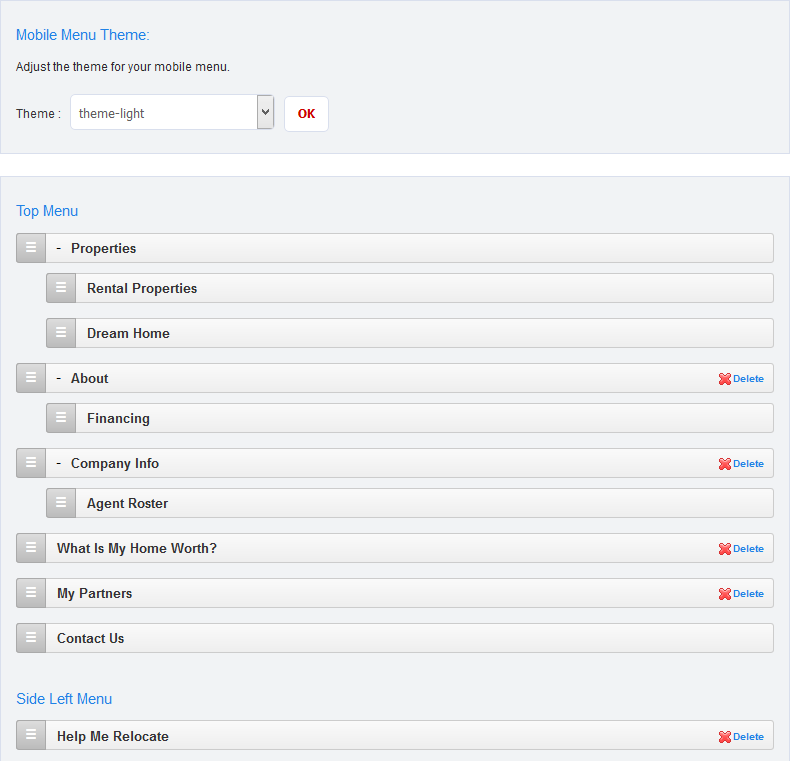
Select the "Manage Menu" tab within the top navigation. From here you can drag and drop your pages to the top navigation or to the left navigation. Remember to click Save to complete any changes made. Take note that the maximum number of main links that you can display in the top navigation is 7. But you can also drag additional links to sit under the main links. These links would show when the visitor hovers over the main link on your live site. This type of link is referred to as a nested link. If you do not need to use certain pages, you can delete them completely or drag the pages to the "Inactive" (recommended) section at the bottom of the page. Within this section, you can also change the color scheme of the mobile navigation menu. By default, the color scheme is "theme-light" but there are currently 4 themes available. |
How do I insert an image using the text and image editors?Within each text and image editor you have several options to insert images directly into your website. Drag and Drop Images into Place (Easiest Option)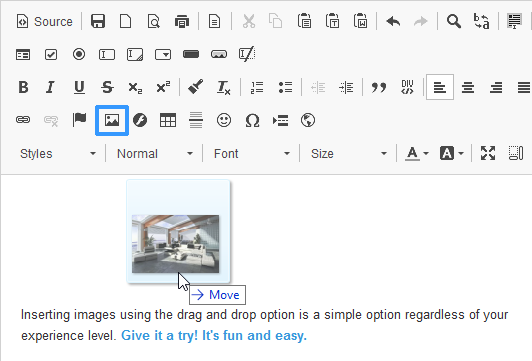
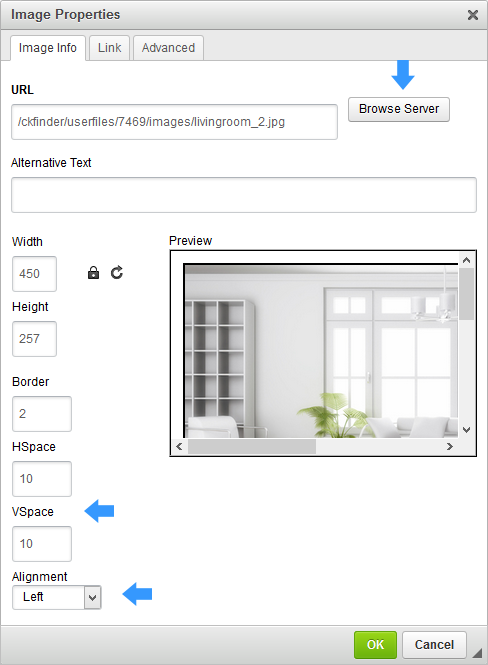
Adjusting the Size of the Image There will be instances where you upload an image and it is either to large or you would you like to resize it to fit better into the body of the page. Adjusting the image's dimensions is easy.
Align Image Left or Right and Add Space around Your Image.
|
How do I apply a link to either text or an image?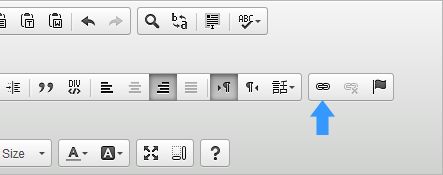
Within each text and image editor you have the option to apply links directly to text or images with the option to add PDF's. Applying Links to Text
Applying PDF Link to Text
Applying Links to Existing Images
|
How do I add social media icons to my site?Choose the "Social Media" tab within the top navigation. Check the box next to each social media icon that you would like to show and enter the corresponding link. Make sure to enter the full web address of the social media site beginning with http or https. When you are finished, click save. You have the option to display the icons in the header, footer or both. In addition, there are 3 different icon styles, color, light grey and dark grey.
|
How do I adjust the font styles that are displayed on my real estate website?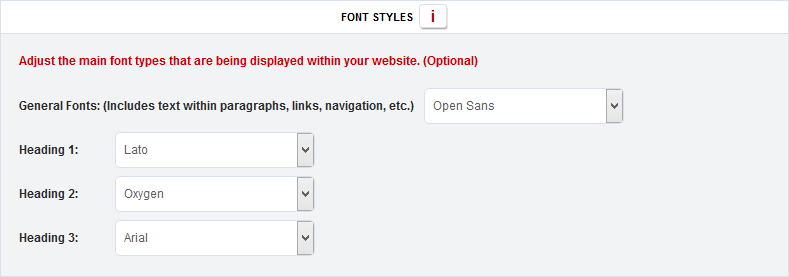
After you login to the Admin Control Panel within the Common Settings section, scroll down the page to the section labeled as "Font Styles". Within this section, you can adjust the main font types that are being displayed within your website including general fonts that you will see within the body, navigation and heading tags.
|
How do I add videos to my real estate website?You can add videos using third party video streaming services such as Vimeo or YouTube. In general, most video streaming services offer a video sharing option that includes a small snippet of code that can easily be added to the "Source" of any of the text and image editors within our Admin Control Panel. This allows the video to be displayed within the page itself. You Tube Video Integration:
|
How do I add Google Translate to my real estate website template?
After you login to the Admin Control Panel within the Common Settings section, scroll down the page to the section labeled as "Google Translate". Here you can set Google Translate to active or inactive and then click save when finished. By default, this function is set to inactive. When active, Google Translate will appear on all pages of your site within the footer.
|
How do I set up my Google Analytics?The first step is for you to create a free Google Analytics account here; http://www.google.com/analytics/. If you already have a Google Account, you would only need to sign up for their Analytics service. During the Google Analytics sign-up process, they will supply you with a tracking code that you can send us directly and we will insert it into all of your existing site pages and future pages dynamically. They may also send you a site verification code that you should also send to us and we will insert it into the header of your website on the home page. Please note that if you have an alternate tracking code that you would prefer to use other than Google Analytics, we can integrate this into your site as well.
|
How do I create my XML Sitemap?Within the left hand navigation under "SEO Functions", select the link entitled Site Map - XML. Here you can set which pages should be included in the Site Map and then click save. You can view your site map at anytime within this section. Click here to learn how to Add and Manage your site map within your Google Webmaster Tools account.
|
How do I change the property related currency displayed on my real estate website template?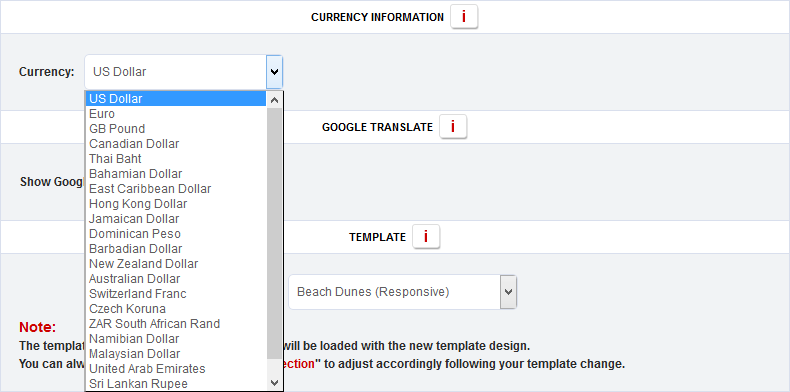
This section is located in the Common Settings section near the bottom of the page. Choose your country's currency from the dropdown menu and save. There are currently 20 currencies available. |